NSOperation
NSOperation的作用:
- 配合使用NSOperation和NSOperationQueue也能实现多线程编程
NSOperation和NSOperationQueue实现多线程的具体步骤:
先将需要执行的操作封装到一个NSOperation对象中
然后将NSOperation对象添加到NSOperationQueue中
系统会自动将NSOperationQueue中的NSOperation取出来
将取出的NSOperation封装的操作放到一条新线程中执行
NSOperation的子类
NSOperation是个抽象类,并不具备封装操作的能力,必须使用它的子类
使用NSOperation子类的方式有3种
- NSInvocationOperation
- NSBlockOperation
- 自定义子类继承NSOperation,实现内部相应的方法
NSInvocationOperation
- 创建NSInvocationOperation对象
- (id)initWithTarget:(id)target selector:(SEL)sel object:(id)arg;
- 调用start方法开始执行操作
- (void)start;
一旦执行操作,就会调用target的sel方法
注意
- 默认情况下,调用了start方法后并不会开一条新线程去执行操作,而是在当前线程同步执行操作
- 只有将NSOperation放到一个NSOperationQueue中,才会异步执行操作
NSBlockOperation
- 创建NSBlockOperation对象
+ (id)blockOperationWithBlock:(void (^)(void))block;
- 通过addExecutionBlock:方法添加更多的操作
- (void)addExecutionBlock:(void (^)(void))block;
- 注意
- 只要NSBlockOperation封装的操作数 > 1,就会异步执行操作
NSOperationQueue
NSOperationQueue的作用
NSOperation可以调用start方法来执行任务,但默认是同步执行的
如果将NSOperation添加到NSOperationQueue(操作队列)中,系统会自动异步执行NSOperation中的操作
添加操作到NSOperationQueue中
- (void)addOperation:(NSOperation *)op;
- (void)addOperationWithBlock:(void (^)(void))block;
最大并发数
- 同时执行的任务数
- 同时开3个线程执行3个任务,并发数就是3
最大并发数的相关方法
- (NSInteger)maxConcurrentOperationCount;
- (void)setMaxConcurrentOperationCount:(NSInteger)cnt;
队列的取消、暂停、恢复
- 取消队列的操作
- (void)cancelAllOperations;// 所有 提示:也可以调用NSOperation的 - (void)cancel方法取消单个操作- 暂停和恢复队列
- (void)setSuspended:(BOOL)b; // YES代表暂停队列,NO代表恢复队列
- (BOOL)isSuspended;
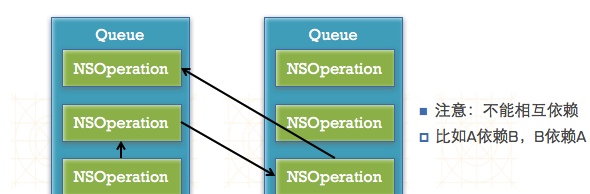
操作依赖
- NSOperation之间可以设置依赖来保证执行顺序
比如一定要让操作A执行完后,才能执行操作B,可以这么写
[operationB addDependency:operationA]; // 操作B依赖于操作A可以在不同queue的NSOperation之间创建依赖关系
- 不可以相互依赖
操作的监听
- 可以监听一个操作的执行完毕
- (void (^)(void))completionBlock;
- (void)setCompletionBlock:(void (^)(void))block;
自定义NSOperation
自定义NSOperation的步骤很简单
重写- (void)main方法,在里面实现想执行的任务
重写- (void)main方法的注意点:
自己创建自动释放池(因为如果是异步操作,无法访问主线程的自动释放池)
经常通过- (BOOL)isCancelled方法检测操作是否被取消,对取消做出响应
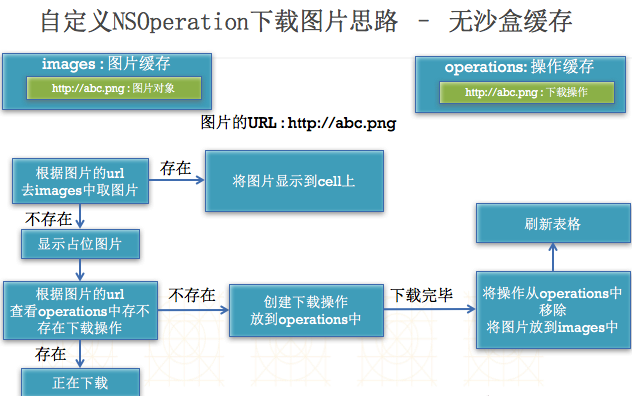
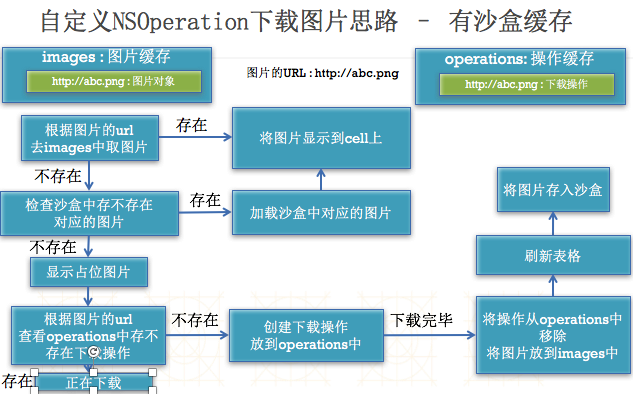
自定义NSOperation下载图片思路
无沙盒缓存
有沙盒缓存
核心步骤
#pragma mark - 数据源方法
- (NSInteger)tableView:(UITableView *)tableView numberOfRowsInSection:(NSInteger)section
{
    return self.apps.count;
}

- (UITableViewCell *)tableView:(UITableView *)tableView cellForRowAtIndexPath:(NSIndexPath *)indexPath
{
    static NSString *ID = @"app";
    UITableViewCell *cell = [tableView dequeueReusableCellWithIdentifier:ID];

    XMGApp *app = self.apps[indexPath.row];
    cell.textLabel.text = app.name;
    cell.detailTextLabel.text = app.download;

    // 先从内存缓存中取出图片
    UIImage *image = self.images[app.icon];
    if (image) { // 内存中有图片
        cell.imageView.image = image;
    } else {  // 内存中没有图片
        // 获得Library/Caches文件夹
        NSString *cachesPath = [NSSearchPathForDirectoriesInDomains(NSCachesDirectory, NSUserDomainMask, YES) firstObject];
        // 获得文件名
        NSString *filename = [app.icon lastPathComponent];
        // 计算出文件的全路径
        NSString *file = [cachesPath stringByAppendingPathComponent:filename];
        // 加载沙盒的文件数据
        NSData *data = [NSData dataWithContentsOfFile:file];

        if (data) { // 直接利用沙盒中图片
            UIImage *image = [UIImage imageWithData:data];
            cell.imageView.image = image;
            // 存到字典中
            self.images[app.icon] = image;
        } else { // 下载图片
            [self.queue addOperationWithBlock:^{
                // 下载图片
                NSData *data = [NSData dataWithContentsOfURL:[NSURL URLWithString:app.icon]];
                UIImage *image = [UIImage imageWithData:data];

                [NSThread sleepForTimeInterval:1.0];

                // 回到主线程显示图片
                [[NSOperationQueue mainQueue] addOperationWithBlock:^{
                    cell.imageView.image = image;
                }];

                // 存到字典中
                self.images[app.icon] = image;
                // 将图片文件数据写入沙盒中
                [data writeToFile:file atomically:YES];
            }];
        }
    }

    return cell;
}